Ctrl+R to turn off the lights – API use case
This is a slightly updated version of a blog post I first did in 2019, it is a fun use case to demonstrate APIs (more on that below) and how you can do something in Alteryx which isn’t a typical business use case.
I often say that Alteryx is like a swiss army knife which allows you to do virtually anything. One of the reasons for this is due to its ability in a no code environment connect to APIs which extend the possibilities of what the tool can do.
In my day job I typically use Alteryx for data preparation and analysis, but by using the Download Tool, you can make use of web-based applications through API requests.
A short intro to APIs
If you are unfamiliar with what an API is (Application Programming Interface), then this definition is a good starter for 10 – “a set of functions and procedures allowing the creation of applications that access the features or data of an operating system, application, or other service”. An API request is typically made up of a url, request and authorisation.
The Alteryx community has these two good posts which outline APIs in a bit more detail:
At work I typically use APIs to pull financial information, such as share price information, but for the purpose of this blog I’m looking at a fun use of Alteryx – using an API request to turn on/off some internet connected lights.
Controlling Hue lights using Alteryx
Applications which use APIs come with documentation on how to set up an account and make a request, for Philips Hue connected bulbs the documentation is outlined here. When I first used APIs I found the documentation difficult to understand, but the more APIs I’ve used I’ve found that there are a few basics get set up and these are covered in the Alteryx Community links above. Then the benefit of using a tool like Alteryx is you can turn the workflow into an analytic app which allows a user interface to easily update the values.
So I am going to follow the documentation and show you how to translate this to Alteryx to control your home lights and understand how to use APIs.
So in the documentation, the first step is to get the IP address of the hub which controls the lights (I’ve hidden my IP address for obvious reasons).

Next we can find out the username which is required to make a request. This is easy to set up in Alteryx only needing two tools (and a browse to easily see the results).

The text input tool is set up with the URL for the API request and the body of the request.

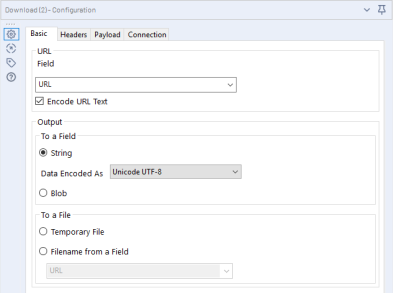
The first request is a POST request which means a new resource is created (i.e. a username). This request is set up in the configuration pane of the download tool, where we select the field which contains the URL of the request, the http action, and the query string of the request.

When the workflow is run the field “DownloadData” contains the JSON output of the download tool which gives you the username.

Now we have a username, we need to understand the information of our lights to make the request. This is acheived with a GET request using the following URL – http://{hub ip address}/api/{username}/lights
This can be configured by updating the URL in the text input tool with the above, and changing the configuration of the payload request in the download tool to be a GET request (i.e. read information).

The response to this is a detail of all the lights connected to the hub. In my home I have over 50 lights connected to the hub, so using the JSON parse tool you can structure the JSON result in an easily readable table.

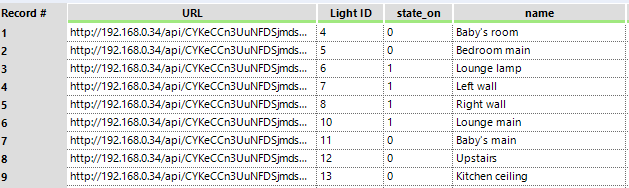
From here we now have all the information we need to make the final request which will change the state (turn on / off) the specific light. This is done via a PUT request* with this modified URL – http://{hub ip address}/api/{username}/lights/{light ID}/state and a body which tells the light whether to turn on or off {“on”:true}.
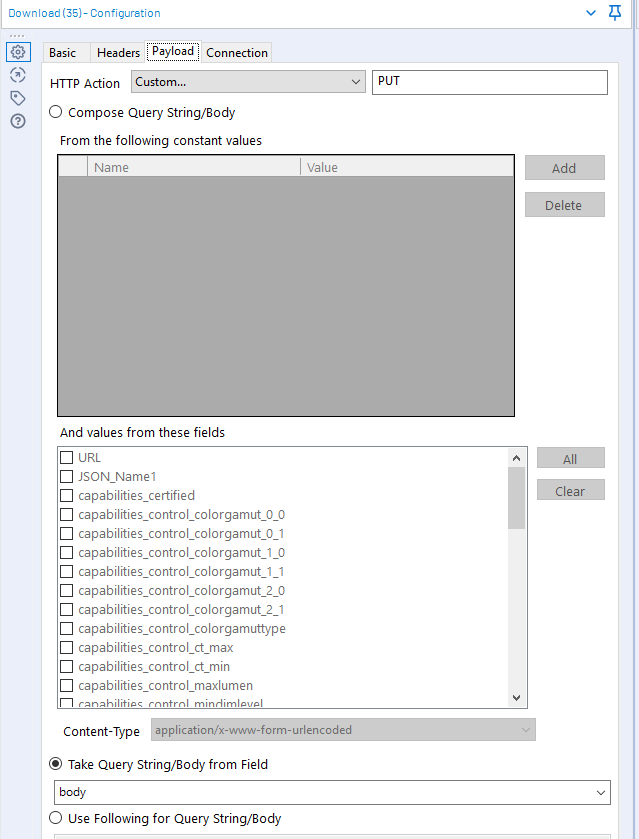
*One quirk I found is Alteryx expects the body of a PUT request to be a blob, this is because typically PUT requests involve uploading data, however the workaround is to make a custom request in the download tool and just type PUT.
Running this workflow then results in the following:
Now taking this a step further, you can tweak the workflow to use the interface tools which turns the workflow into an Analytic App which creates a user interface to pick which light you want to control. There’s also additional requests which mean you can change things like the brightness and colour of the bulb.